Now, when you are already familiar with scripts, let's see what else can be done with their help. There are quite a few useful commands out there, so I'd like to show you which of them are exceptionally good. It's not like it's going to help you much if you're not interested in scripting for Photoshop, in which case you can just skip the whole chapter. But if you are interested, these commands might give you ideas
#target photoshop
If you add this as the first line of your script, you w
var doc = app.activeDocument;
This is the command that will save you lots of time
app.preferences.rulerUnits = Units.PIXELS;
We always work with pixels as it's the only relevant unit in retouching for the web. But not everyone is like that! If you try and use a script that operates in pixels in a Photoshop that is set to operate in inches, it might cause some problems, especially when you're trying to align images. By using the line above you're making sure everything goes well.
app.backgroundColor.rgb.hexValue = 'FFFFFF';
Sets the background color to white. Why? Because when we extend canvas size, Photoshop will fill the extra space with the background swatch color. If you need it white, make sure it's set to white first.
app.activeDocument.guides.removeAll();
Removes all guides from the image. A good thing for retouchers that love adding a bunch of guides here and there. Yes, they are only visible in Photoshop, but they can be annoying. If your align&resize script makes its own guides, it's reasonable to remove any existing guides first – after resizing they will end up in wrong places anyway.
app.activeDocument.channels.removeAll();
Removes alpha channels from the image. When you use alpha channels for alignment, you have to save via scripts, because you can't just save an image as a
app.activeDocument.pathItems.removeAll();
Removes any occasional pen points or things like that, as path items can interfere with image alignment. It goes like this: you accidentally place a point with the Pen Tool, making a new path. And then you think twice and switch to another tool and make your selection with it. But the point is still there, and when you try to align the image, it gets all weird. I still don't know when exactly this bug arises, but I know that any pen points left unattended are bad. So it's a good idea to prevent anything bad from happening – just add this line to your saving action next to the line that removes alpha-channels.
app.activeDocument.flatten();
Flattens your image. As we can't save layered images in the jpeg format, it's a good idea to flatten them all just in case when saving, or when aligning.
app.activeDocument.selection.selectAll();
Selects the whole image – just like the Select All command. “Selection” is a special word that you can use when you work with selections. Pay attention, that we don't select the document. We select the selection, and it's a part of the document. You can deselect, feather, expand, contract, smooth and fill selections here as well.
app.activeDocument.crop(app.activeDocument.selection.bounds);
Crops the image according to the current selection without any resizing. Won't work if there's nothing selected in the image.
app.activeDocument.crop( Array(X1,Y1,X2,Y2),angle,width,height,ppi);
This command crops your image. And there's quite a bunch of arguments you can stick here. The X1, Y1, X2, Y2 define the crop area. X1 and Y1 define the top left corner of the crop box. 0,0 is the top left corner of the image according to the inverted cartesian coordinate system that Photoshop uses. So if you put (0,0,100,1000) in the array you'll get a rectangle 100 pixels wide, 1000 pixels high. There are more arguments, but they are totally optional. Angle means the angle of rotation. Width and height will resize the crop box to the desired values. If you don't want your crop box to be resized, don't put anything there. But you can't really skip some of the arguments in the middle. If you don't want any particular
app.activeDocument.activeLayer.applyDustAndScratches(radius,threshold);
You can apply filters, too. Pay attention to the fact that filters do not get applied to the document. They only get applied to the active layer. If you try to use any filter just on the document, it won't work. Photoshop uses a particular structure, where any layer is a part of a document, and you have to address both to make it work. The Dust&Scratches filter needs arguments to work – just like in real life. Put some values in both radius and threshold placeholders. They can be any positive number or zero.
try
{to do something}
catch (err)
{do something else}
Now, this is absolutely cool. You know already that there are some situations when a script cannot just do its thing and gives you an error instead. Like when you try to access a selection that doesn't exist. Here's how you can not just avoid, but use it. In one of the image aligning scripts, I wanted to check if there was a selection active in the image. If there was one, I would use it to align the image. But if there was no selection, I didn't want an error to pop up as it would stop the script from running. So here's what I did:
try
{var sel = app.activeDocument.selection.bounds;
var selectionYes = true;}
catch (err)
{var selectionYes = false;}
Now if there's a selection active, I get a variable “
alert("Text of the message", "Name of the window");
This one will give you an alert message. It's good to alert users about something they're evidently doing wrong. Like running an alpha-channel-based aligning script on an image that doesn't have an alpha channel. But it's not just useful for that. I also use it for debugging my scripts when something doesn't work and I don't understand what's going on (and this happens quite often!). So I do it like this: alert(“
app.activeDocument.activeHistoryState = app.activeDocument.historyStates[app.activeDocument.historyStates.length-2];
This one will take you one step back in history. Greyed-out history steps are steps, too. Replace -2 with any other number you need, but if it's more than your current history length (number of steps recorded in the history of your active document), you'll get an error. app.activeDocument.historyStates.length-1 will do nothing if you have no greyed-out steps. But if you do, they all will stop being greyed-out.
if (app.activeDocument.quickMaskMode == true)
{app.activeDocument.quickMaskMode=false;}
else
{app.activeDocument.quickMaskMode=true}
This is how you switch the Quick Mask mode on and off in Javascript. You can't do it in a single line because the state of the current image is unknown. If it's already in the quick mask mode, you can't switch it on without an error. So you check if it's on first, and if it's off, switch it on. If it's on, switch it off.
if (app.activeDocument.colorProfileName=="sRGB IEC61966-2.1")
{ //put your saving script here}
else
{alert ("Incorrect RGB Profile!" , "Fail!");}
We already discussed how to check if the image size is correct in order to save it. You can do more than just that. It's also possible to check if the image has a correct RGB profile or not. In big image productions it's an absolute must-have, as you can't imagine how many retouchers are not able to set up their Photoshop and ACR correctly. This piece of code checks if the current image profile is sRGB, and if not, it alerts the user.
Javascript gives us countless possibilities to speed up and enhance the retouching process. I can't list all the useful commands and tricks here as there are too many. I did this little section not because I want you to remember and use all the code above, but to show that programming doesn't have to be tough at all. Even if you don't really understand how things work, you can copy and paste and save and run a simple script, and sometimes a single line of code will save you a lot of time and effort.
Not everything in scripting for Photoshop can be written in clear Javascript. Sometimes it's not enough, so let me tell you about another way of scripting that requires even less programming skills than what we've done before.
Script Listener
Script Listener is a simple tool that eavesdrops on Photoshop and writes all the things it does in a file. At first glance, it looks like gibberish, but it's actually valuable data. The best thing about it is that if you copy proper parts from the log file to your scripts, it will work just as well as if it was in Javascript. But as it's gibberish, it might prove to be harder than it sounds.
If you google “script listener photoshop”, you'll be able to find and download it from one of the Adobe websites. They also provide instructions on how to install the listener, so I'll be really short: download, quit Photoshop, decompress and copy the
A file (ScriptingListenerJS.log) will appear on your desktop. It's a log file where all the things you do in Photoshop will be recorded from now on. That is – until you remove the Utilities folder containing the script listener from the Photoshop Plug-Ins folder. It will be filling up with gibberish quite quickly, so if you really want to experiment with that, make sure you clear the log before you start. Every action, be it tool selection, brush strokes, filter application or anything like that, will be recorded there. For example, I'll press Q in Photoshop to enter the Quick Mask mode. Here's what appears in the log:
var idsetd = charIDToTypeID( "setd" );
var desc6 = new ActionDescriptor();
var idnull = charIDToTypeID( "null" );
var ref1 = new ActionReference();
var idPrpr = charIDToTypeID( "Prpr" );
var idQucM = charIDToTypeID( "QucM" );
ref1.putProperty( idPrpr, idQucM );
var idDcmn = charIDToTypeID( "Dcmn" );
var idOrdn = charIDToTypeID( "Ordn" );
var idTrgt = charIDToTypeID( "Trgt" );
ref1.putEnumerated( idDcmn, idOrdn, idTrgt );
desc6.putReference( idnull, ref1 );
executeAction( idsetd, desc6, DialogModes.NO );
As you can see, this is some kind of code that is not easy to decipher. But it's not like you really have to. Just copy the whole thing in ESTK and it will do its thing there just like Javascript. And if you want to quit the Quick Mask mode, you'll have to use this:
var idCler = charIDToTypeID( "Cler" );
var desc7 = new ActionDescriptor();
var idnull = charIDToTypeID( "null" );
var ref2 = new ActionReference();
var idPrpr = charIDToTypeID( "Prpr" );
var idQucM = charIDToTypeID( "QucM" );
ref2.putProperty( idPrpr, idQucM );
var idDcmn = charIDToTypeID( "Dcmn" );
var idOrdn = charIDToTypeID( "Ordn" );
var idTrgt = charIDToTypeID( "Trgt" );
ref2.putEnumerated( idDcmn, idOrdn, idTrgt );
desc7.putReference( idnull, ref2 );
executeAction( idCler, desc7, DialogModes.NO );
I don't really like to use this feature because it gives a lot of code and it's not easy to understand how it works. Quick Mask is easy, as nothing can go wrong here. But try using a tool like the Magic Wand, and you'll understand how difficult it might get. So if I just click in the upper left corner of an image with the Magic Wand, I'll get this:
var idAddT = charIDToTypeID( "AddT" );
var desc9 = new ActionDescriptor();
var idnull = charIDToTypeID( "null" );
var ref4 = new ActionReference();
var idChnl = charIDToTypeID( "Chnl" );
var idfsel = charIDToTypeID( "fsel" );
ref4.putProperty( idChnl, idfsel );
desc9.putReference( idnull, ref4 );
var idT = charIDToTypeID( "T " );
var desc10 = new ActionDescriptor();
var idHrzn = charIDToTypeID( "Hrzn" );
var idPxl = charIDToTypeID( "#Pxl" );
desc10.putUnitDouble( idHrzn, idPxl, 3.000000 );
var idVrtc = charIDToTypeID( "Vrtc" );
var idPxl = charIDToTypeID( "#Pxl" );
desc10.putUnitDouble( idVrtc, idPxl, 4.000000 );
var idPnt = charIDToTypeID( "Pnt " );
desc9.putObject( idT, idPnt, desc10 );
var idTlrn = charIDToTypeID( "Tlrn" );
desc9.putInteger( idTlrn, 15 );
var idAntA = charIDToTypeID( "AntA" );
desc9.putBoolean( idAntA, true );
executeAction( idAddT, desc9, DialogModes.NO );
A click with the Magic Wand tool is not something that can be
The good thing about the Script Listener is that you can just use these chunks of code without any alterations and make scripts that work without even basic knowledge of programming. But as you won't have a good grip on what exactly this code does, you might get in trouble because of that. As I don't like doing things I don't understand, I try to stick to Javascript all the time, and I only use the Script Listener plug-in when I can't do what I want with Javascript.
You can actually use both methods for somewhat more reliable results. This chunk of code above, the one that describes a magic wand click, is not very useful as it is. But it can be transformed into a function for more control over the process, and you won't have to struggle while looking for variable placeholders. Like this:
function magWand(x,y,t,) {
if(arguments.length < 2) return;
if(t == undefined) var t = 10;
var idAddT = charIDToTypeID( "AddT" );
var desc18 = new ActionDescriptor();
var idnull = charIDToTypeID( "null" );
var ref10 = new ActionReference();
var idChnl = charIDToTypeID( "Chnl" );
var idfsel = charIDToTypeID( "fsel" );
ref10.putProperty( idChnl, idfsel );
desc18.putReference( idnull, ref10 );
var idT = charIDToTypeID( "T " );
var desc19 = new ActionDescriptor();
var idHrzn = charIDToTypeID( "Hrzn" );
var idPxl = charIDToTypeID( "#Pxl" );
desc19.putUnitDouble( idHrzn, idPxl, x );
var idVrtc = charIDToTypeID( "Vrtc" );
var idPxl = charIDToTypeID( "#Pxl" );
desc19.putUnitDouble( idVrtc, idPxl, y );
var idPnt = charIDToTypeID( "Pnt " );
desc18.putObject( idT, idPnt, desc19 );
var idTlrn = charIDToTypeID( "Tlrn" );
desc18.putInteger( idTlrn, t );
var idAntA = charIDToTypeID( "AntA" );
desc18.putBoolean( idAntA, true );
executeAction( idAddT, desc18, DialogModes.NO );
}
Now if you want to click somewhere with the Magic wand, you just copy this chunk into your script, and then invoke the function while specifying where exactly and with what Tolerance you want to click, like this:
magWand(0,0,10);
Here, 0 is x, 0 is y, and 10 is tolerance. This will result in a click in the upper left corner with tolerance set to 10. If you don't give the function at least 2 arguments (x and y), it won't work. If you don't specify the tolerance, it will be set to 10. It's also possible to use more arguments, like anti-alias and contiguous settings, but they are usually set to true anyway.
Once again: use the script listener to see how Photoshop reflects things it does in code, copy chunks of code while keeping in mind that all the settings are encoded somewhere there, use the code to make useful scripts. There's just one downside of this method: scripts that are written with the Script Listener's help are more prone to bugs and unexpected failures than your regular JavaScript code. But that's very reasonable: when there's gibberish instead of code, it's easy to miss something vital. Once I've had a script that used a chunk of gibberish code that applied the Find Edges filter. It turned out to work on the Background layer only, while in JavaScript whatever you try to apply can be applied to the active layer, be it the Background or anything else.
That's why I encourage you to resort to the Script Listener only when it's not possible otherwise, but if you use the same chunks of code in the same conditions, it might work surprisingly well.
Script Events Manager
There's another powerful feature in Photoshop that allows you automate even more than your regular scripts and actions. Script Events Manager can run scripts and actions for you – and automatically, when certain events happen. You can access the Script Events Manager via the File menu, Scripts submenu. The first thing you have to do when accessing it for the first time is to check the checkbox in the upper left corner.
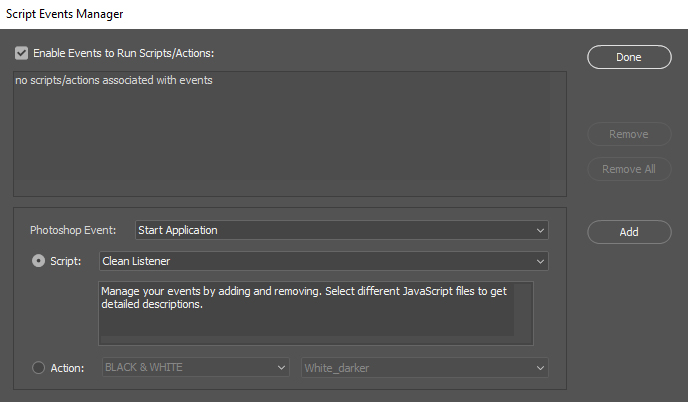
Here's how it works. You set an event first. An event is anything that happens. Photoshop offers a few options in the Photoshop Event dropout menu, but there's nothing really worth mentioning
So if you set it this way – pick the “Start Application” event and “Clean Listener” script, then you need to press the
You can run any scripts or action when any event happens. It's a bit tough to think of a good match between an event and an action, but here's an idea. You know that every time you Crop an image or change its size by using the Image Size or the Canvas Size command, you can't use the History Brush anymore and you need to set its source to the current step. Well, why not do it automatically?
Record a simple action that only does one thing: set the History Brush source to the current step. You can record it by clicking on the checkbox next to the current (the last) step in the History panel (it must be empty at this moment). When that's done, open the Script Events Manager, open the Photoshop Event dropout menu and click on the last option in the list, which is “Add an Event”. There are just two input windows there – the first one is the name, which you can just make up. The last one is the Descriptive Label for an event. You can't make it up, but there's a list of events that will be recognized by Photoshop. For Canvas Size, put CnvS there.

Now press OK and when you have the event, click on the Action to make it active and pick your newly created action from the list. Don't forget to click on the Add button when you have both the event and the action set up. Then press Done and from now on, every time you change the Canvas Size of any image, Photoshop will set the History Brush source to the Canvas Size step. But that will only happen if you access the Canvas Size panel manually. Any actions that utilize the Canvas Size won't trigger the Script Events Manager. But you know, if you use actions that change the Canvas Size, you can set the History Brush source there as well.

As for the Image Size and the Crop events, you can add them as well in exactly the same manner. The Descriptive Label for Crop is “Crop”, and Image Size is “ImgS”.
Here's a list of all the Events that can be used in the Script Events Manager. It's very important that you use them without any quotation marks! All you have to do is just find an application for them, but if you can't, don't get all disappointed. At least you know about this great tool now, so when the opportunity arises, you'll know where to look.
Events list
3DTransform 'TdT '
Average 'Avrg'
ApplyStyle 'ASty'
Assert 'Asrt'
AccentedEdges 'AccE'
Add 'Add '
AddNoise 'AdNs'
AddTo 'AddT'
Align 'Algn'
All 'All '
AngledStrokes 'AngS'
ApplyImage 'AppI'
BasRelief 'BsRl'
Batch 'Btch'
BatchFromDroplet 'BtcF'
Blur 'Blr '
BlurMore 'BlrM'
Border 'Brdr'
Brightness 'BrgC'
CanvasSize 'CnvS'
ChalkCharcoal 'ChlC'
ChannelMixer 'ChnM'
Charcoal 'Chrc'
Chrome 'Chrm'
Clear 'Cler'
Close 'Cls '
Clouds 'Clds'
ColorBalance 'ClrB'
ColorHalftone 'ClrH'
ColorRange 'ClrR'
ColoredPencil 'ClrP'
ContactSheet "0B71D221-F8CE-11d2-B21B-0008C75B322C"
ConteCrayon 'CntC'
Contract 'Cntc'
ConvertMode 'CnvM'
Copy 'copy'
CopyEffects 'CpFX'
CopyMerged 'CpyM'
CopyToLayer 'CpTL'
Craquelure 'Crql'
CreateDroplet 'CrtD'
Crop 'Crop'
Crosshatch 'Crsh'
Crystallize 'Crst'
Curves 'Crvs'
Custom 'Cstm'
Cut 'cut '
CutToLayer 'CtTL'
Cutout 'Ct '
DarkStrokes 'DrkS'
DeInterlace 'Dntr'
DefinePattern 'DfnP'
Defringe 'Dfrg'
Delete 'Dlt '
Desaturate 'Dstt'
Deselect 'Dslc'
Despeckle 'Dspc'
DifferenceClouds 'DrfC'
Diffuse 'Dfs '
DiffuseGlow 'DfsG'
DisableLayerFX 'dlfx'
Displace 'Dspl'
Distribute 'Dstr'
Draw 'Draw'
DryBrush 'DryB'
Duplicate 'Dplc'
DustAndScratches 'DstS'
Emboss 'Embs'
Equalize 'Eqlz'
Exchange 'Exch'
Expand 'Expn'
Export 'Expr'
Jumpto 'Jpto'
ExportTransparentImage "02879e00-cb66-11d1-bc43-0060b0a13dc4"
Extrude 'Extr'
Facet 'Fct '
Fade 'Fade'
Feather 'Fthr'
Fibers 'Fbrs'
Fill 'Fl '
FilmGrain 'FlmG'
Filter 'Fltr'
FindEdges 'FndE'
FitImage "3caa3434-cb67-11d1-bc43-0060b0a13dc4"
FlattenImage 'FltI'
Flip 'Flip'
Fragment 'Frgm'
Fresco 'Frsc'
GaussianBlur 'GsnB'
Get 'getd'
Glass 'Gls '
GlowingEdges 'GlwE'
Gradient 'Grdn'
GradientMap 'GrMp'
Grain 'Grn '
GraphicPen 'GraP'
Group 'GrpL'
Grow 'Grow'
HalftoneScreen 'HlfS'
Hide 'Hd '
HighPass 'HghP'
HSBHSL 'HsbP'
HueSaturation 'HStr'
ImageSize 'ImgS'
Import 'Impr'
InkOutlines 'InkO'
Intersect 'Intr'
IntersectWith 'IntW'
Inverse 'Invs'
Invert 'Invr'
LensFlare 'LnsF'
Levels 'Lvls'
LightingEffects 'LghE'
Link 'Lnk '
Make 'Mk '
Maximum 'Mxm '
Median 'Mdn '
MergeLayers 'Mrg2'
MergeLayersOld 'MrgL'
MergeSpotChannel 'MSpt'
MergeVisible 'MrgV'
Mezzotint 'Mztn'
Minimum 'Mnm '
ModeChange "8cba8cd6-cb66-11d1-bc43-0060b0a13dc4"
Mosaic 'Msc '
Mosaic_PLUGIN 'MscT'
MotionBlur 'MtnB'
Move 'move'
NTSCColors 'NTSC'
NeonGlow 'NGlw'
Next 'Nxt '
NotePaper 'NtPr'
Notify 'Ntfy'
Null typeNull
OceanRipple 'OcnR'
Offset 'Ofst'
Open 'Opn '
Paint 'Pnt '
PaintDaubs 'PntD'
PaletteKnife 'PltK'
Paste 'past'
PasteEffects 'PaFX'
PasteInto 'PstI'
PasteOutside 'PstO'
Patchwork 'Ptch'
Photocopy 'Phtc'
PicturePackage "4C1ABF40-DD82-11d2-B20F-0008C75B322C"
Pinch 'Pnch'
Place 'Plc '
Plaster 'Plst'
PlasticWrap 'PlsW'
Play 'Ply '
Pointillize 'Pntl'
Polar 'Plr '
PosterEdges 'PstE'
Posterize 'Pstr'
Previous 'Prvs'
Print 'Prnt'
ProfileToProfile 'PrfT'
Purge 'Prge'
Quit 'quit'
RadialBlur 'RdlB'
Rasterize 'Rstr'
RasterizeTypeSheet 'RstT'
RemoveBlackMatte 'RmvB'
RemoveLayerMask 'RmvL'
RemoveWhiteMatte 'RmvW'
Rename 'Rnm '
ReplaceColor 'RplC'
Reset 'Rset'
ResizeImage "1333cf0c-cb67-11d1-bc43-0060b0a13dc4"
Reticulation 'Rtcl'
Revert 'Rvrt'
Ripple 'Rple'
Rotate 'Rtte'
RoughPastels 'RghP'
Save 'save'
Select 'slct'
SelectiveColor 'SlcC'
Set 'setd'
SharpenEdges 'ShrE'
Sharpen 'Shrp'
SharpenMore 'ShrM'
Shear 'Shr '
Show 'Shw '
Similar 'Smlr'
SmartBlur 'SmrB'
Smooth 'Smth'
SmudgeStick 'SmdS'
Solarize 'Slrz'
Spatter 'Spt '
Spherize 'Sphr'
SplitChannels 'SplC'
Sponge 'Spng'
SprayedStrokes 'SprS'
StainedGlass 'StnG'
Stamp 'Stmp'
Stop 'Stop'
Stroke 'Strk'
Subtract 'Sbtr'
SubtractFrom 'SbtF'
Sumie 'Smie'
TakeMergedSnapshot 'TkMr'
TakeSnapshot 'TkSn'
TextureFill 'TxtF'
Texturizer 'Txtz'
Threshold 'Thrs'
Tiles 'Tls '
TornEdges 'TrnE'
TraceContour 'TrcC'
Transform 'Trnf'
Trap 'Trap'
Twirl 'Twrl'
Underpainting 'Undr'
Undo 'undo'
Ungroup 'Ungr'
Unlink 'Unlk'
UnsharpMask 'UnsM'
Variations 'Vrtn'
Wait 'Wait'
Event 4-char ID or String
WaterPaper 'WtrP'
Watercolor 'Wtrc'
Wave 'Wave'
Wind 'Wnd '
ZigZag 'ZgZg'